Setting Up Your Email
Notice: In August 2021, new settings.
Our standard and premium mailboxes can be loaded onto your device or through your mail client either with a POP3 connection or an IMAP connection.
By using an IMAP connection, you can have multiple clients simultaneously connected to the same mailbox. For example, you can have email on your phone, your tablet, and your computer, and when you delete a message from your phone, it will also be deleted on your other devices, for this reason, we recommend using IMAP over POP3.
The way your device or mail client is designed may be different than how other programs or devices work, with different names for the same steps.
Your device or program should have detailed information on how to add and set up mailboxes onto the system, but there are general pieces of information you need to complete the process.
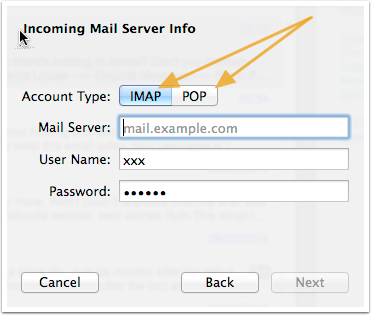
When selecting the account type, select IMAP.
Your User Name is your full email address.
Your Password is your mailbox password.
If you use IMAP:
User Name: [email protected]
Password: password123
Outgoing Mail Server: mta.extendcp.co.uk
Outgoing Mail Server Port: 587
Outgoing Mail Server SSL: STARTTLS
Outgoing Authentication Type: Password
Note: Your mail server can be set to mail.yourdomain.com or mailXX.extendcp.co.uk (mailXX being the server your package is assigned to (this can be found in your control panel).
Incoming IMAP Server: imap.extendcp.co.uk
Incoming IMAP Server Port: 993
Incoming IMAP SSL: SSL/TLS
Incoming IMAP Authentication Type: Password
If you use POP3:
User Name: [email protected]
Password: password123
Outgoing Mail Server: mta.extendcp.co.uk
Outgoing Mail Server Port: 587
Outgoing Mail Server SSL: STARTTLS
Outgoing Authentication Type: Password
Note: Your mail server can be set to mail.yourdomain.com or mailXX.extendcp.co.uk (mailXX being the server your package is assigned to (this can be found in your control panel).
Incoming POP3 Server: pop3.extendcp.co.uk
Incoming POP3 Server Port: 995
Incoming POP3 SSL: SSL/TLS
Incoming POP3 Authentication Type: Password
1. This guide will show you how to set up a mailbox on your new web server.
2. Connect your computer, iPad or smart phone to the mailbox, so you can collect and send email.
Login:
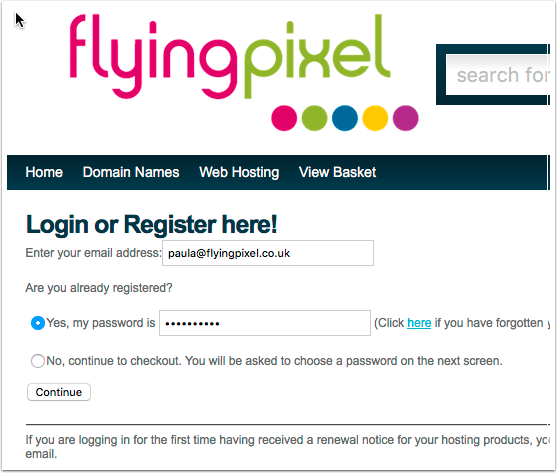
Using the username and password in your Welcome Email, login to your account.
http://flyingpixel.co.uk/web-hosting/login
Your Account
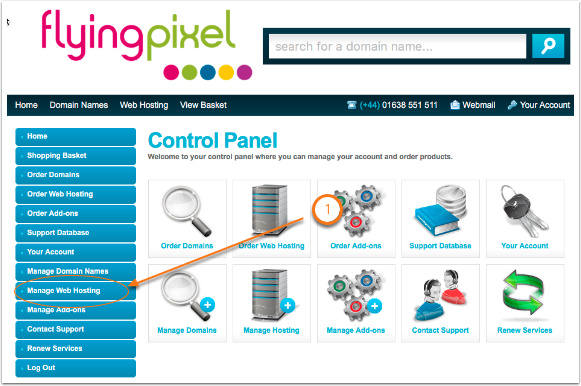
- Once in your account click on Manage Web Hosting.
Choose the Account to Manage
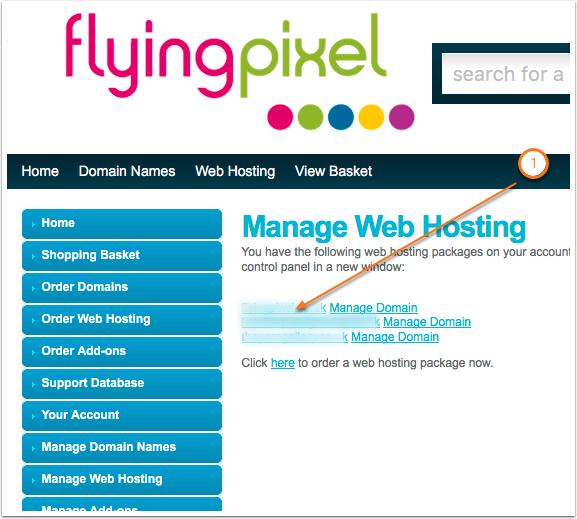
You may have more than 1 account with us, they will all be listed here.
- Click on the name of the account you wish to manage.
Your Web Hosting Account
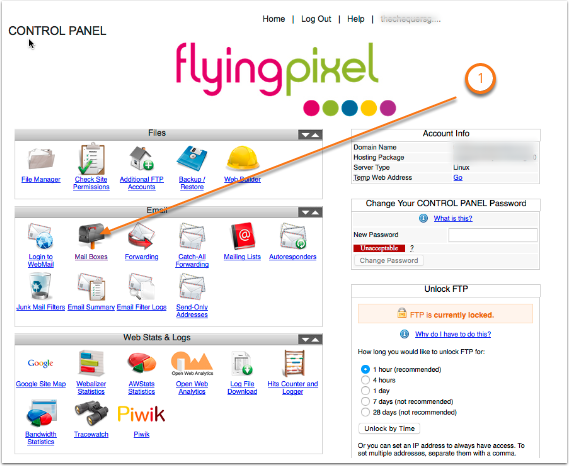
You will now be logged into your hosting account control panel
- Click on Mail Boxes
Adding a Mail Box
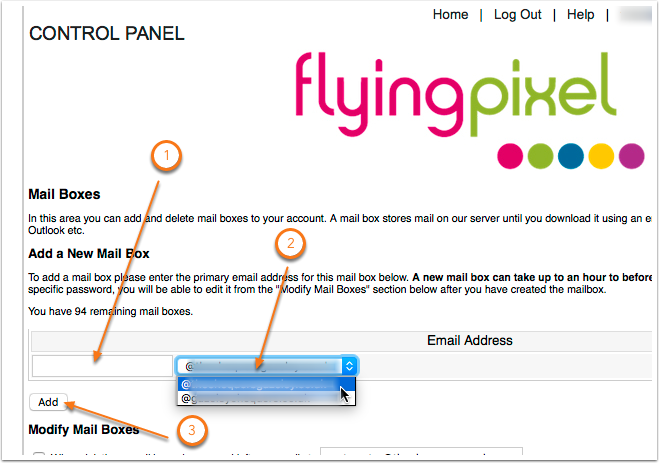
- Type the chosen email name here
- You may have more than 1 domain name on this account so use the drop down to chose the required extension
- Click add
The Mail Box has been created
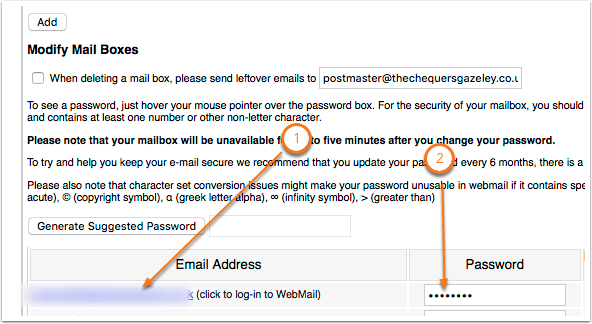
- The mailbox will be listed below with any others you make.
- This field in encrypted. If you have forgotten your password you will need to set a new one here.
**High security passwords containing special character are highly recommended. A simple password can lead to your email account being abused by 3rd parties to send spam and gain access to your email.
*** Please note it can take up to 1 hour for these new Email Boxes to become fully functional.
Connecting to Your Mail Box Using iMAP or POP3
What is the difference between POP3 and IMAP4 mail?
All major email clients allow mailboxes to be accessed via either POP3 or IMAP4.
These are two different protocols. On your desktop client, POP3 is downloaded directly from the mail server onto your computer.
Your computer will store a "local copy" of the mail, and usually delete it from the server. You can create local folders on your computer to organise the mail, but you won't see these or your mail if you logged in using webmail.
Additionally, if you create folders to organise your mail in webmail, you won't be able to access these on your desktop client.
Mail will therefore only contribute towards the mailbox limits while it is left undownloaded in the inbox.
IMAP4, in contrast, is left on the server (where it will continue contributing towards your mailbox limit). If you create folders/organise your mail in your desktop client, you will see this update when you log in with the webmail client (and vice-versa). Similarly, when you mark a message as "read" in webmail, it will appear "read" in your desktop client.
If you're accessing your mail on several different computers, IMAP can therefore be useful.
Set up email on Outlook 2010
Setting up e-mail in Outlook 2010
Here is a step by step guide on setting up your e-mail account in Microsoft Outlook 2010.
This guide specifies only the options you need to change from the defaults, so if any options are not listed here, they don't need to be changed.
Steps to setting up your mailbox in Outlook
- Start Outlook.
- From the File menu, click "Account Settings".
- Click "New".
- Click "E-mail Account"
- In the Auto Account Setup dialog box, click to select the "Manually configure server settings or additional server types" check box, and then click Next.
- Click "Internet E-Mail", and then click Next.
- Fill out the required settings as follow:
Your Name: Your name exactly as you want it to appear to recipients when they receive email from you
Email Address: your full email address - e.g. [email protected]
Account Type: IMAP (recommended)
Incoming mail server: mail.<domain> - replace <domain> with your domain name, so for example mail.my-domain.com
Outgoing mail server (SMTP): mail.<domain> - same as the Incoming mail server
Username: your full email address once again
Password: your mail box password
Ensure that 'Require logon using Secure Password Authentication (SPA) remains unchecked. This is important as you may experience difficulty sending email with this enabled.
- Click "More Settings..." in the bottom right of the window.
- Click "Outgoing Server" tab at the top.
- Tick the box labelled "My outgoing server (SMTP) requires authentication".
- Ensure that the "Use same settings as my incoming mail server" is selected.
- Click "Advanced" tab at the top.
- In the Outgoing mail (SMTP) box, type 587.
- Ensure that 'This server requires an encrypted connection (SSL) is unchecked.
- The 'Use the following type of encrypted connection:' option should be set to None.
- Click "OK" to close the window.
- Click Next after you have completed entering this configuration information, and then click Finish.
Setting up my email with Mail for Mac OS X
On the menu bar click Mail, then Preferences, then Accounts and finally click the plus at the bottom right.
General Information
Account Type: POP or IMAP
Account Description: A personal description for your mail box
Full Name: Your Name
Email Address: The email address you created
Click Continue
Incoming Mail Server
Incoming Mail Server: mail.yourdomain
Username: your email address
Password: mailbox password
Click Continue
Outgoing Mail Server
Outgoing Mail Server: mail.yourdomain
User Authentication - ticked
Username: your email address
Password: your mailbox password
Click Continue
Account Summary
Check your settings
Click Continue if you are happy with them.
Click Done
How do I set up POP3/IMAP email on an iPhone or iPad?
You can setup your iPhone or iPad to receive mail from one of your mailboxes as follows:
Go to Settings > Mail, Contacts, Calendars > Add Account > Other > Add Mail Account
On the next screen enter the following settings:
Name: Your name as you would like recipients to see it
Address: The email address for the mailbox you want to setup
Password: The password for the mailbox
Description: Your own description for the mailbox
Press Save
On the next screen, leave IMAP selected at the top and enter the following settings:
Incoming Mail Server
Host Name: mail.yourdomainname (Or the mail server host name/IP address)
User Name: The email address for the mailbox you want to setup
Password: The password for the mailbox (should already be filled in)
Outgoing Mail Server
SMTP: mail.yourdomainname (Or the mail server host name/IP address)
User Name: The email address for the mailbox you want to setup
Password: The password for the mailbox
Press Save
You will then get a message saying “Cannot Connect Using SSL. Do you want to try setting up the account without SSL?”, press Yes.
It should then connect to the mail server and the account will be setup.
If you are having problems with sending mail, you may need to change the port for the SMTP server. You can do this by going to Settings > Mail, Contacts, Calendar > Select the mail account > SMTP > Primary Server > Server Port and changing this to 587.